
The first Avid Baker's Challenge recipe of the year is Eve Lieb's Processor Challah from Flo Braker's book, Baking for all Occasions. As some of you might know, I'm a bit of a yeast-phobe. When it comes to making anything with yeast, I feel like I have 2 left hands. To gain more experience in this area, I'm planning on baking more bread and other yeasted baked goods in 2011. Hence Challah in January to start the year on a strong and happy note (hopefully!). I also love the smell of freshly baked bread, especially in the winter time.
Challah, pronounced Kha-Laah (easy to do, if you speak Dutch, Arabic or Hebrew, otherwise listen to the pronunciation here), is a traditional Jewish bread, that's usually braided, and enjoyed on the Sabbath. This is only the second time I've eaten Challah but I can see why this is a weekly tradition. Even though the dough doesn't contain any butter or milk, due to dietary restrictions, it is plenty rich from eggs. Some recipes I've seen use as much as 8 egg yolks.
 |
| My first Challah. Not bad for a rookie! :o) |
For this month's ABC recipe, I invited a couple of my friends to be a guest blogger. All are experienced bread and/or Challah bakers, so do check out their Challah posts:
- Levine of Uit de Keuken van Arden (even if you don't understand Dutch, the pictures alone will inspire you to bake your own bread - you could always use Google Translate, if you'd like the recipe)
- Anat of A Special Cake (she bakes Challah almost every week so I definitely consider her a connoisseur - she also, cautiously, suggested dedicating this post to my late Jewish friend, Svetlana, if I felt up to it; thanks Anat!)
- Foley of Foley's Bread ("the bread meister" - the first Challah bread I ever tasted was his so he definitely deserves that title!)
Although the recipe says to let it rise until doubled in volume and then braid it, I punched down the dough, shaped it into a ball and let it rise again. After it rose again, I did the same thing once more. This develops more flavor in the bread but the main reason I did this is because I was busy with other things and couldn't attend to the bread.
 |
| The dough after the final (and third) rise |
 |
| The dough structure after the final rise |
 |
| The braided loaf after an overnight rise in the fridge |
 |
| The dough now needs to come to room temperature and continue its final rise before baking |
The bread is taken out of the oven after 15 minutes and then brushed a second time with the remaining egg wash. Once the bread's internal temperature registers 200F degrees, the bread is done. For me, this took an additional 20 minutes in my convection oven at 325F degrees. Note: when you bake in convection mode, you always have to decrease the baking temperature by 25F degrees.
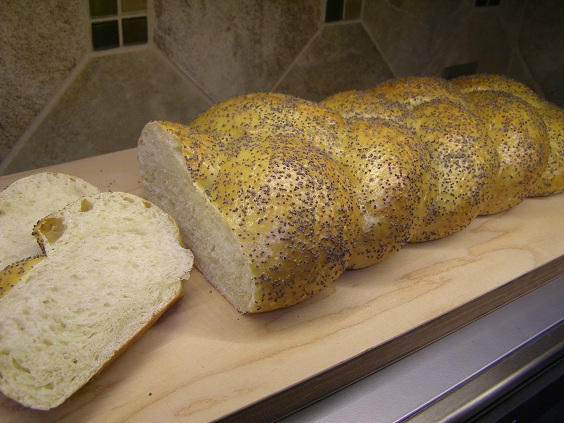 |
| Finally, it's "taste test time" :o) |
The bread has a soft interior, yet it feels firm... in a good way. It also has a nice chewy texture to it. The outer edges are golden brown and crispy. You can see tiny blisters on the outside of the bread. The poppy seeds add a nice subtle crunch to the bread. I would definitely call this a success!
 |
| Look at that beautiful, slightly open and coarse crumb! |
I dedicate this blog post to my Jewish/Russian friend, Svetlana, as well as her husband, Charles. They were both became victims of domestic violence and lost their lives in the summer of 2010. You might remember them from THIS blog post when I made their wedding cake. They left behind 3 children; Ingrid (11), Thorin (9), and Bjorn (9 months). Sadly, our friendship only lasted 3 years but I'd rather have known them both for 3 short years than not at all. It's funny how food can connect people from different backgrounds. Svetlana made me Borscht (beet soup) and Blinis, while Charles and I argued "talked extensively" about why Chili should/shouldn't have any beans in it :o) I will treasure those memories forever! (one of Svetlana's friends posted this slide show/video on YouTube).
Final thoughts/tips:
- Hubby liked this bread a lot. It was soft, flavorful, with a nice crunch from the poppy seeds. He gave it an 8.5 out of 10.
- I was happy that the bread rose nicely, and that it wasn't dense and heavy, like some of my breads tend to be :o) I loved the soft interior against the crust that was crunchy from the double egg wash and the poppy seeds.
- We dipped the bread in some extra-virgin olive oil (with some sliced garlic in it). Later, we slathered it with butter and jam, and enjoyed it with some homemade soup.
- Change (1): the recipe calls for 6 Tbsp of vegetable oil. I used 3 Tbsp of vegetable oil and 3 Tbsp of extra-virgin olive oil, which perfumed the bread beautifully.
- Change (2): the recipe calls for 2 extra-large eggs (which I never buy). I used 3 eggs instead and slightly reduced the water amount.
- I use my microwave as a proofing box. In other words, that's where I let my dough rise. I learned that yeast thrives in a warm (not hot) and humid environment. In order to create that environment, I put a cup or mug filled with very hot (almost boiling water) in the microwave as well as my bowl of dough covered in plastic wrap, and close the door. The steam from the water quickly creates adds both heat and humidity in the (relatively) small space of the microwave. Do not turn on the microwave with the dough in it.
- Yay! I'm one step closer to overcoming my yeast phobia :o)
- See what the other ABC bakers thought of this month's recipe. You can find the ABC blog roll HERE.
- If you own Flo Braker's book, or have easy access to it, and would like to join us, please read the ABC rules and then email me at HanaasKitchen [at] live [dot] com.
Yeast phobia? Where? This is a gorgeous loaf of bread Hanâa!
ReplyDeleteGreat looking challah, Hanaa! You'll see that the more you work with yeast the more you won't understand why you had a phobia (which is what happened to me).
ReplyDeleteI love to toast my challah on Sat. morning and lather it with 10% Fage yogurt. Mega yum!!
Thanks for inviting me to blog with you.
I made pizza today (with yeast)- if you host an on-line pizza party - blog - please invite me...
Anat
Hanaa, great job on the challah! I don't think you have any reason to be scared of yeast breads (at least not anymore). Yours turned out beautifully! I think I'll have to make this sometime, but it probably won't be this week. The birthday cakes just consumed all of my time this week, but I will definitely join the group in baking next month. :)
ReplyDeleteHello Hanaa
ReplyDeleteThis recipe is almost the same like the recipe I use, the only difference is the time to leave the dough to rise, I think it is important to make the bread fluffy, and the second rise to allow the texture to be more even.
Your bread is great, tastes very good, need to be a little bit more fluffy.
Foley
Hooray! I just saw what we are making for Feb. I made one for Thanksgiving this year and let me give you a hint...Fantastic!
ReplyDeleteIt's beautiful!!! Bravo for besting the yeast! Wish me luck.....
ReplyDeleteI'm so sorry about your friends.
What a sensational challah. And it's your first? I can't believe you have a yeast phobia at all!
ReplyDeleteI am so sorry about your friends. How thoughtful of you to dedicate this post to them.
Great job, looks so yummy! Definitely something I would love to do.
ReplyDeleteBeautiful, beautiful challah, Hanaa. Very sweet to honor your two lost friends with this post. God keep them.
ReplyDeletePerfectly done challah! love it!
ReplyDeletewonderful! it's simply beautiful!
ReplyDeleteI found your challah...great braiding job!
ReplyDeletewe have something similar to this here in Switzerland its called Zopf (braid) we usually eat it every Sunday morning for breakfast. I love it, yours loooks very yummy :)
ReplyDelete@Aimée: I just googled "zopf" and you're right, it is VERY similar to Challah, almost the same ingredients too :o)
ReplyDelete