Pages

Sunday, January 31, 2010

SMS - Butterscotch Pudding

This week's Sweet Melissa Sundays recipe, Butterscotch Pudding, was chosen by Jennifer of Maple 'n Cornbread. To think I almost passed on this one, since I already baked 2 SMS recipes this month. This pudding was great and was easily put together. The oven did most of the work :o)

One way of piping the whipped cream on top...

And another... I ended up choosing this one for my dinner party

I served mine with sweetened whipped. Anything "fancier" would just interfere with the rich caramel flavor of the pudding. If I had to describe the pudding, I would say that it tastes like a creme brulee where the sugary crispy top is integrated into the creamy vanilla pudding underneath. It's rich, has lots of caramel flavor, without being overly sweet, and it's super creamy.

Ahhhh! The creamy goodness underneath is finally revealed.

Ready to take my first bite. Yum! My mouth is in heaven!

This recipe did go through a couple of changes which I have outlined below in the "final thoughts/tips" section. A big thanks to Jennifer for picking another SMS winner. You can find the recipe on HERE.

Final thoughts/tips:
  • My guests, hubby and I loved this recipe. Even though it's a fairly rich dessert, hubby asked me why I served it in "small ramekins", ha ha. My answer: "if you knew how many calories were in it, you wouldn't ask for seconds" :o)
  • The most important change I made to this recipe is adjust the salt. Boy, when I read that the recipe called for 1 tsp of salt, I knew that had to change immediately. I didn't measure the amount of salt I poured into my hand but I'd guess it's between 1/4 tsp and 3/4 tsp. Not quite 1/2 tsp.
  • Being that the egg yolks make this recipe rich already, I reduced the amount of cream and replaced it with whole milk, ending up using half cream, half whole milk. I had no issues with this ratio.
  • The 6 ramekins baked for about 50 minutes. I forgot to cover them with aluminum foil. Nothing bad happened. The pudding had a thin soft "crust" on top.
  • Don't throw away those egg whites. Put them in a ziploc bag, date it and freeze them for up to 1 year. When you need to make meringues or angel food cake, thaw them overnight in the refrigerator.
  • Check out what other SMS bakers thought of this recipe.

Sunday, January 24, 2010

SMS - Black Bottom Brownies

This week's Sweet Melissa Sundays recipe, Black Bottom Brownies, was chosen by Cynthia of Bakingtherapist's Blog. This recipe combines two favorites: brownies and cheesecake. I love both so I figured I'd like them even better together.

I never had or made Cheesecake Brownies before so this was certainly exciting. However, the thought of making a plain vanilla cheesecake batter to pour on top of the brownie batter didn't sound that exciting to me. What could I change to spruce things up? What goes with chocolate? Hmmm... pretty much anything. Looked in my fridge and there was my answer. Raspberries it is then!

Spread the brownie batter evenly in the pan.

Pour the raspberry cheesecake batter on top, sprinkle with mini chocolate chips, and in the oven it goes.

About 45 minutes later, it looked like this. Now it has to cool completely.

I made half a batch and after 45 minutes, I removed the brownies from the oven and set them outside in 30 degree F weather to cool for about 4 hours. Then it was tasting-time. Using a heart-shaped cookie cutter, I cut the brownies into cute little hearts. Mmmm... the creamy raspberry cheesecake complimented the dense and fudgy brownie beautifully. My only criticism would be that the brownie edges were overbaked and very dry. I expect some of that, but in this case, you could easily cut off a whole inch on all sides to get to the fudgy part. Next time I'll use cake strips.

Used a heart-shaped cookie cutter to make it look extra special :o)

If you'd like to give these a try, pick up a copy of The Sweet Melissa Baking Book or go to Cynthia's blog for the recipe. Thanks for such a great recipe pick, Cynthia!!

Bon appetit!

Final thoughts/tips:
  • Hubby and I enjoyed these brownies a lot. The cheesecake part was perfectly creamy and the raspberries gave it a nice fruitiness with a little tang. The brownie part was dense and fudgy, and very chocolaty. I liked the combination of both. Would definitely make this again.
  • Made only half a recipe and used a metal 8" square pan.
  • Instead of using all granulated sugar, I used half granulated sugar, half brown sugar. The latter helps in creating moist and fudgy brownies.
  • The recipe calls for a significant amount of eggs. I wasn't too worried about the 2 whole eggs and 1 egg yolk in the brownie batter. However, the cheesecake batter required 3 whole eggs for 8 oz of cream cheese. That's a very high ratio of cream cheese to eggs and I don't like desserts to taste "eggy". So I used 2 eggs instead.
  • Instead of regular cream cheese I used a 8 oz tub of raspberry cream cheese bagel spread from my favorite bakery, Panera Bread. I added about 1/4 cup of thawed out raspberries to the batter.
  • The batter looked pretty runny to me so I added 1 Tbsp of flour to it. As a general rule of thumb, it's always good to add 1 Tbsp of flour to cheesecake batter to prevent it from cracking or sinking because the flour acts as a stabilizer.
  • Sprinkled about 1/4 to 1/3 cup of mini chocolate chips on top of the raspberry cheesecake batter.
  • Baked it in a 300F oven with convection ON for 45 minutes.
  • Don't forget to check out what the other SMS bakers thought of this week's recipe.

Monday, January 18, 2010

HCB - Torta de las Tres Leches

I picked this week's recipe for the Heavenly Cake Bakers: Torta de las Tres Leches. Yay! I chose to make this cake for my husband's birthday. And since Marie already made this cake before, I'm your guest host for this week :o)

A little history lesson... Although nobody knows for sure where this recipe originated from, it's thought to be somewhere south of our border. The Leches Leches cake, which stands for "3-milk cake", is a sponge or butter cake, soaked with a milk mixture, usually containing 3 types of milk: sweetened condensed milk, evaporated milk and cream. In some instances, sweetened condensed milk is replaced with Dulce de Leche, which is caramelized sweetened condensed milk. I have done this before and that's really good too.

Rose's version of this cake uses a sponge cake and 4 types of milk: sweetened condensed milk, cream, skim and whole milk. The latter is cooked until reduced by half. I "cheated" and used 2 1/2 cups of evaporated milk instead.

About 30 seconds after removing the pan from the heat; not much volume and still pretty yellow

About halfway through the beating; at least doubled in volume and paler in color.

After 5 minutes; close to quadrupled in volume and very pale. Ready for the flour.

Poured the batter into my makeshift 3" pan and baked for 30 minutes, with convection turned OFF.

The sponge cake was easy to put together: heat up eggs, sugar, salt and vanilla au-bain-marie, and followed by a good beating in the stand mixer until quadrupled in volume. Gently fold in the flour and you're done. Since the sugar dissolves into the warm eggs anyway, I used regular granulated sugar, whereas normally I would have used the food processor to make superfine sugar.

Here's the baked sponge cake; nicely domed in the middle with a couple cracks.

I don't have a 9" x 3" round pan so I used my 9" x 2.5" spring form pan with a parchment paper collar. This worked very well too. I probably could have omitted the collar altogether because the cake didn't rise above the pan on the sides, like it did in the middle.

Removed the top crust but preserved the hump in the middle

While the cake is cooling, I prepared the milk mixture and then sat it in the fridge. After the cake is completely cooled, I removed the top crust. Normally I would have used my cake leveler for that but Rose specifically says to leave the hump in the middle. So I used a serrated knife instead. This brought back memories from when I sculpted two Bundt cakes into a volcano :o) Nothing goes to waste in this house (not often anyway) because I hate wasting food. I tasted the crust and it reminded me of lady fingers. Yum! I poured some Tres Leches over it and voila, there's your mini-torta!

The cake is ready for its milk bath

Nice and slow otherwise it'll end up in the gap between the pan and the cake.

After lining my 9" spring form pan with plastic wrap and putting the cake back in it, I slowly poured the milk mixture on the cake. This was the thirstiest cake I had ever seen. I could have easily poured in another 2-3 cups of milk, it seemed. Into the fridge it goes for an overnight rest before frosting it.

Instead of plain whipped cream, I made caramel whipped cream. Now don't get me wrong, I love sweetened whipped cream, but this is a birthday cake after all and I wanted it to be extra-special. To make caramel whipped cream, you start out by making a dry caramel. This means put sugar in a pan with a heavy bottom on low-medium heat, and wait until the sugar melts and caramelizes. The first 10-15 minutes is like watching paint dry. No change whatsoever. After that it goes pretty quick. After it's amber colored, you add cream at which point some of the caramel will seize and consequently harden, so you return the pan to the heat and re-melt it. Refrigerate overnight, then whip into luscious caramel-flavor whipped cream the next day and frost your cake of choice with it.

Ta-dah! The rose and leaf decorations are Caramel Panna Cotta which is cooked cream/milk/sugar + kosher gelatin.

After taking the cake out of the pan using the bottom of my 11" tart pan, I frosted only the top of the cake. There was too much milk oozing from the bottom. I contemplated using a straw to drink it (obviously the cake had more than it needed so I wasn't "stealing" it)... but I didn't. In any case, I feared that frosting applied to the sides would slide off the cake so I abstained. For next time, I think I will use less milk.

As you can see, there is quite a puddle of milk surrounding the cake. I need to find a straw!

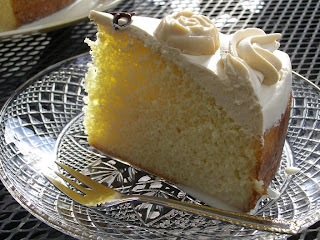
A slice of milky goodness. Bon appetit!

Final thoughts/tips:
  • Hubby and I both liked the cake. The caramel whipped cream gave it a another dimension of milky-ness. We didn't feel it was overly sweet. The cake is not soggy at all. It's pretty sturdy when you cut it into it, but still melts in your mouth.
  • For a change of pace, you could try substituting Dulce de Leche for the sweetened condensed milk. Especially if you like caramel flavor.
  • The sponge cake is so good that I will use it to make other desserts as well.
  • The roses and leaves I used on the cake for decoration are Caramel Panna Cotta poured into candy molds, left to firm up in the fridge overnight. I got the recipe for the Panna Cotta from my dear friend Jane. Thanks Jane! :o)

Sunday, January 3, 2010

HCB - Whipped Cream Cake

Update (Jan 6, 2010): Amazon has posted 3 recipes from Rose's Heavenly Cakes on its site, one of them being the recipe for the Whipped Cream Cake. Click HERE to go straight to the recipe. If my post on this cake, doesn't convince you to make it, nothing else will :o)


Whipped Cream Cake
has been chosen as the first recipe of the year from Rose's Heavenly Cakes, for the Heavenly Cake Bakers to bake. This cake contains no butter. All of the fat, not counting fat in egg yolks, comes from using whipped cream. Interesting, huh? I thought so!


My friend made this cake a couple of months ago and I loved it. The very first bite reminded me of my favorite childhood (butter) cake. How can this cake taste buttery when there's no butter in it? :o) Needless to say, I was very excited to make it myself this week. To make this cake extra special, I used a rose-shaped bundt pan.

I was so happy it came out of the pan in one piece. Thanks to Baker's Joy with Flour!

About 2 hours after the cake came out of the oven, it was cooled completely (thanks to our below zero temperatures). I couldn't wait to take a bite (so what, if it's 11:00pm?). I boiled water to make tea, then cut two slices (hubby wanted to taste it too), took a few pictures and then brought everything downstairs. Without tasting it, I knew the cake was moist, and in looking at the cake's crumb, I knew it was going to be soft and tender. The first bite was everything I imagined it to be. Actually, each bite was. I was going to ask hubby how he liked it, but seeing how he was scraping the remaining crumbs on his plate onto his fork, I had my answer. The best part about eating a cake the same day it's baked, is that the inside is soft and melts in your mouth, while the outer edges of the cake are still crispy. Another winner!!!

An inside look. Have a bite! :o)

SMS - Chocolate Cream Caramels

Yay, the SMS baking group is back. Thanks to Jeanette of The Whimsical Cupcake for picking this week's SMS recipe, Chocolate Cream Caramels. I was going to sit this one out as I have more sweets in the house than furniture :o), but the thought of sitting out the first SMS recipe of the year just didn't sit right with me.

Make-shift 5" x 4" pan using Reynolds non-stick foil, sprayed with non-stick spray. Used Ghirardelli's unsweetened chocolate for the caramels.

The caramels need to set before being cut. Guess who gets to lick the spatula? I call it quality control :o)

Boy, am I glad I made these, even though I only made a 1/4 of the recipe. The unsweetened chocolate cut right through the intense sweetness of these caramels. After a 4 hour rest in the cool basement, they were perfectly set. Cutting them with the chef's knife was a breeze. Instead of wrapping them in wax paper, I put them in paper candy cups which gave them an elegant look.

A quarter of the recipe yielded 25 pieces. That's enough to eat *and* share with friends!

Put caramels in paper candy cups and you're ready to serve! Bon appetit!

Final thoughts/tips:
  • Hubby, who normally doesn't like caramels, liked these a lot. The chocolate flavor came through very well.
  • I took the caramel off the heat at 248 F degrees, per the recipe. This produced the perfect consistency in my opinion; not too soft, not too hard.
  • Instead of honey, I used amber agave nectar.
  • I asked myself, what would make these awesome caramels, even more awesome? A bath in melted chocolate! These would give the store bought candy, Riesen, a run for its money.
  • Next time, I might add coarsely chopped (and toasted) almonds to the caramel.
  • For the recipe, please visit Jeannete's blog at The Whimsical Cupcake.
  • As always, don't forget to check out the SMS blog roll.